Ok, the title is a little lame but it's all I could come up with. Feel free to offer some other alternative! I am seriously loving textures. They give you a freedom with your photos like you wouldn't believe. Just changing the layer style gives you a brand new picture, add to that a higher or lower opacity and you have a work of art! This is the photo I am going to work with today:
At this point you may want to go sign up (free) at CG Textures. I used their "PlasterWhiteDirty0054" texture for this tutorial. They have awesome textures, as many as you can think of!
Step 1. Open your photo in Photoshop.
Step 2. Now open your texture. Using the move tool, drag your texture onto your photo. If it does not cover the whole photo, drag the transform controls so that it does. You can do this quickly by dragging diagonally.
Step 3. In your layers panel, choose a style from the drop-down menu on the left. I usually start with overlay. Now my photo looks like this:
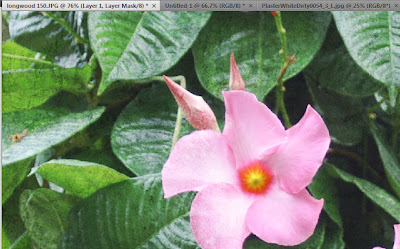
Step 4. Change the opacity of the texture layer. I like this texture but it was still a little too harsh for me. I dropped the opacity to 75% so the photo now looks like this:
Step 5. I wanted the prominent, open flowers in the front to have a little more pop. So, on the texture layer I added a layer mask. That is the square with the cirlcle in it at the bottom of the layers panel. Now, making sure that your foreground color is black, paint the open flowers. This takes away the texture on the flowers. You can change the opacity of your brush if you want to leave a little of the texture on the flowers. For this photo I left it at 100%. You'll notice I did the mask on the right side of this flower. This was for demonstration purposes so you could see what the mask does.
Here is the final product.
Did I miss something important? Do you have any questions? Please feel free to ask. I have never done a tutorial before but I know that some people really enjoy seeing textures and have wondered how to use them.


No comments:
Post a Comment